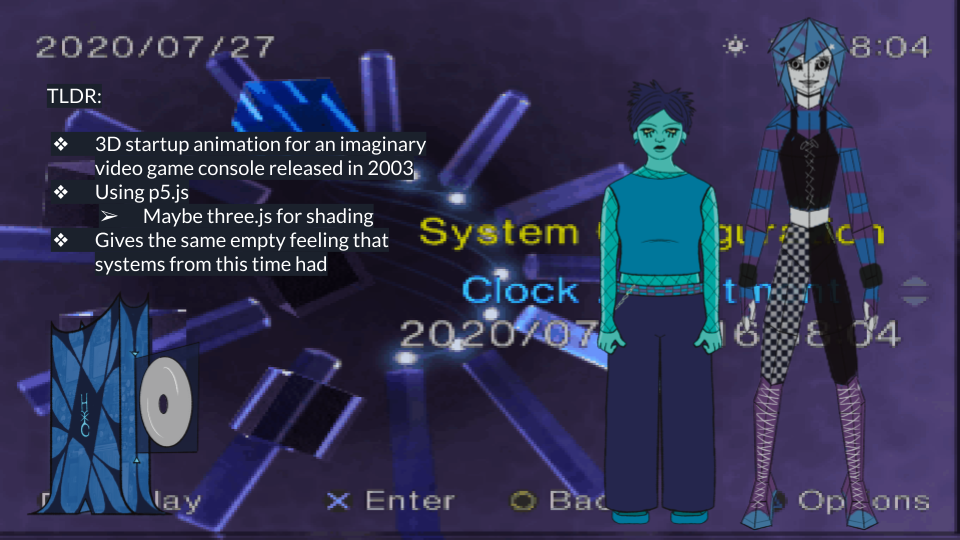
Final Creative Assignment - Fake Video Game Console Startup
For the final assignment, I knew I wanted to create something to supplement the animated horror film I want to begin production on in January. The film is about a goth girl in 2003 that falls in love with a girl in a haunted video game. Stylistically, the main character will be 2D and the video game character 3D, so I wanted to use p5.js to design a 3D startup animation for a fake console that could theoretically exist in the early 2000s.
I was highly inspired by the physical and UI designs of the Playstation 2, the original Xbox, and the Hyper Scan. I thought the choices of geometric vs organic design was interesting and wanted to marry the two of them, and I noticed that the startup animations usually mirrored the physical designs of the consoles in some way: the Playstation 2 is very rectangular and sharp so the UI is predominantly cubes, whereas the Xbox had a more rounded shape to the console so the startup animation is organic.
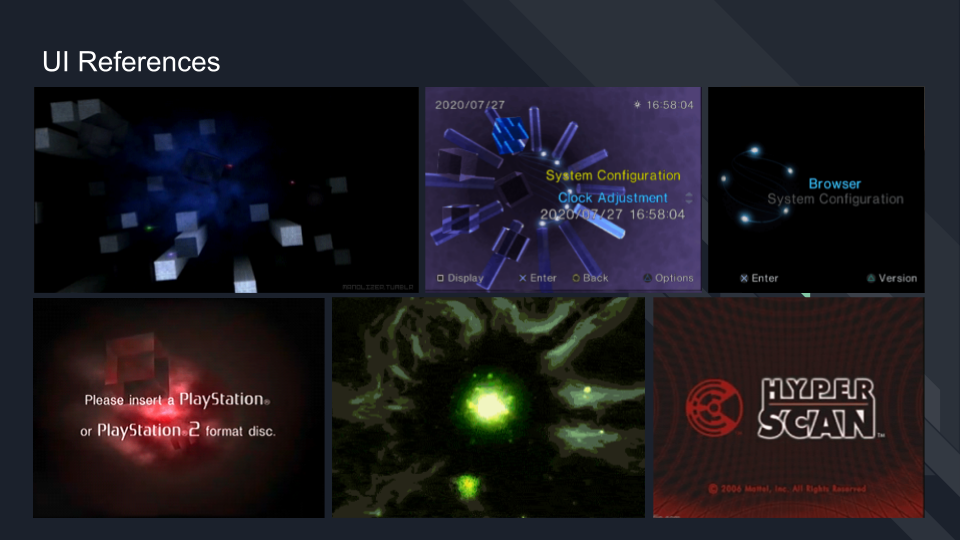
Since the physical designs of the consoles informed the UI designs, I finalized my design for the console so that I could draw inspiration for it. I liked the disk tray coming out vertically in the design of the PS2 and the Wii, the horned shape and latticing of the Hyper Scan, and the liquid of the Xbox UI, so I combined them all into this design.

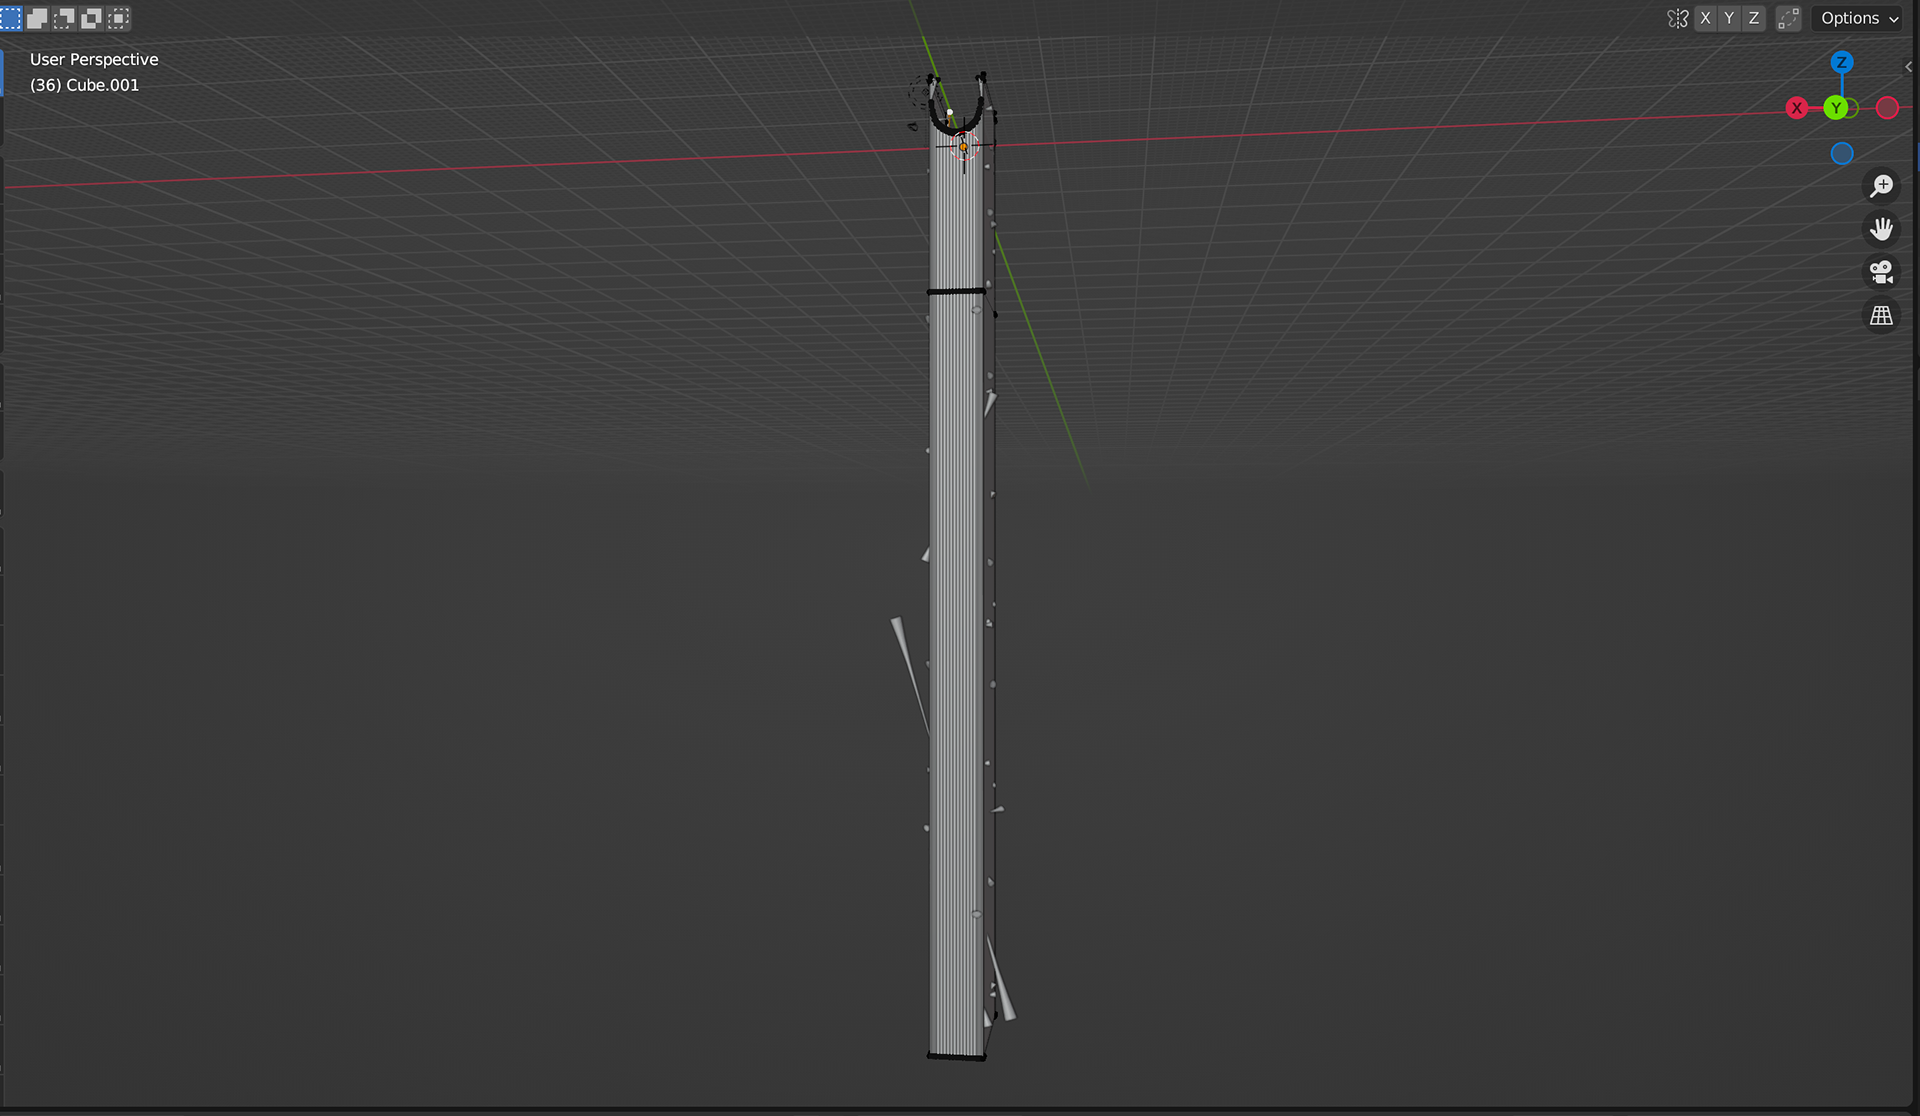
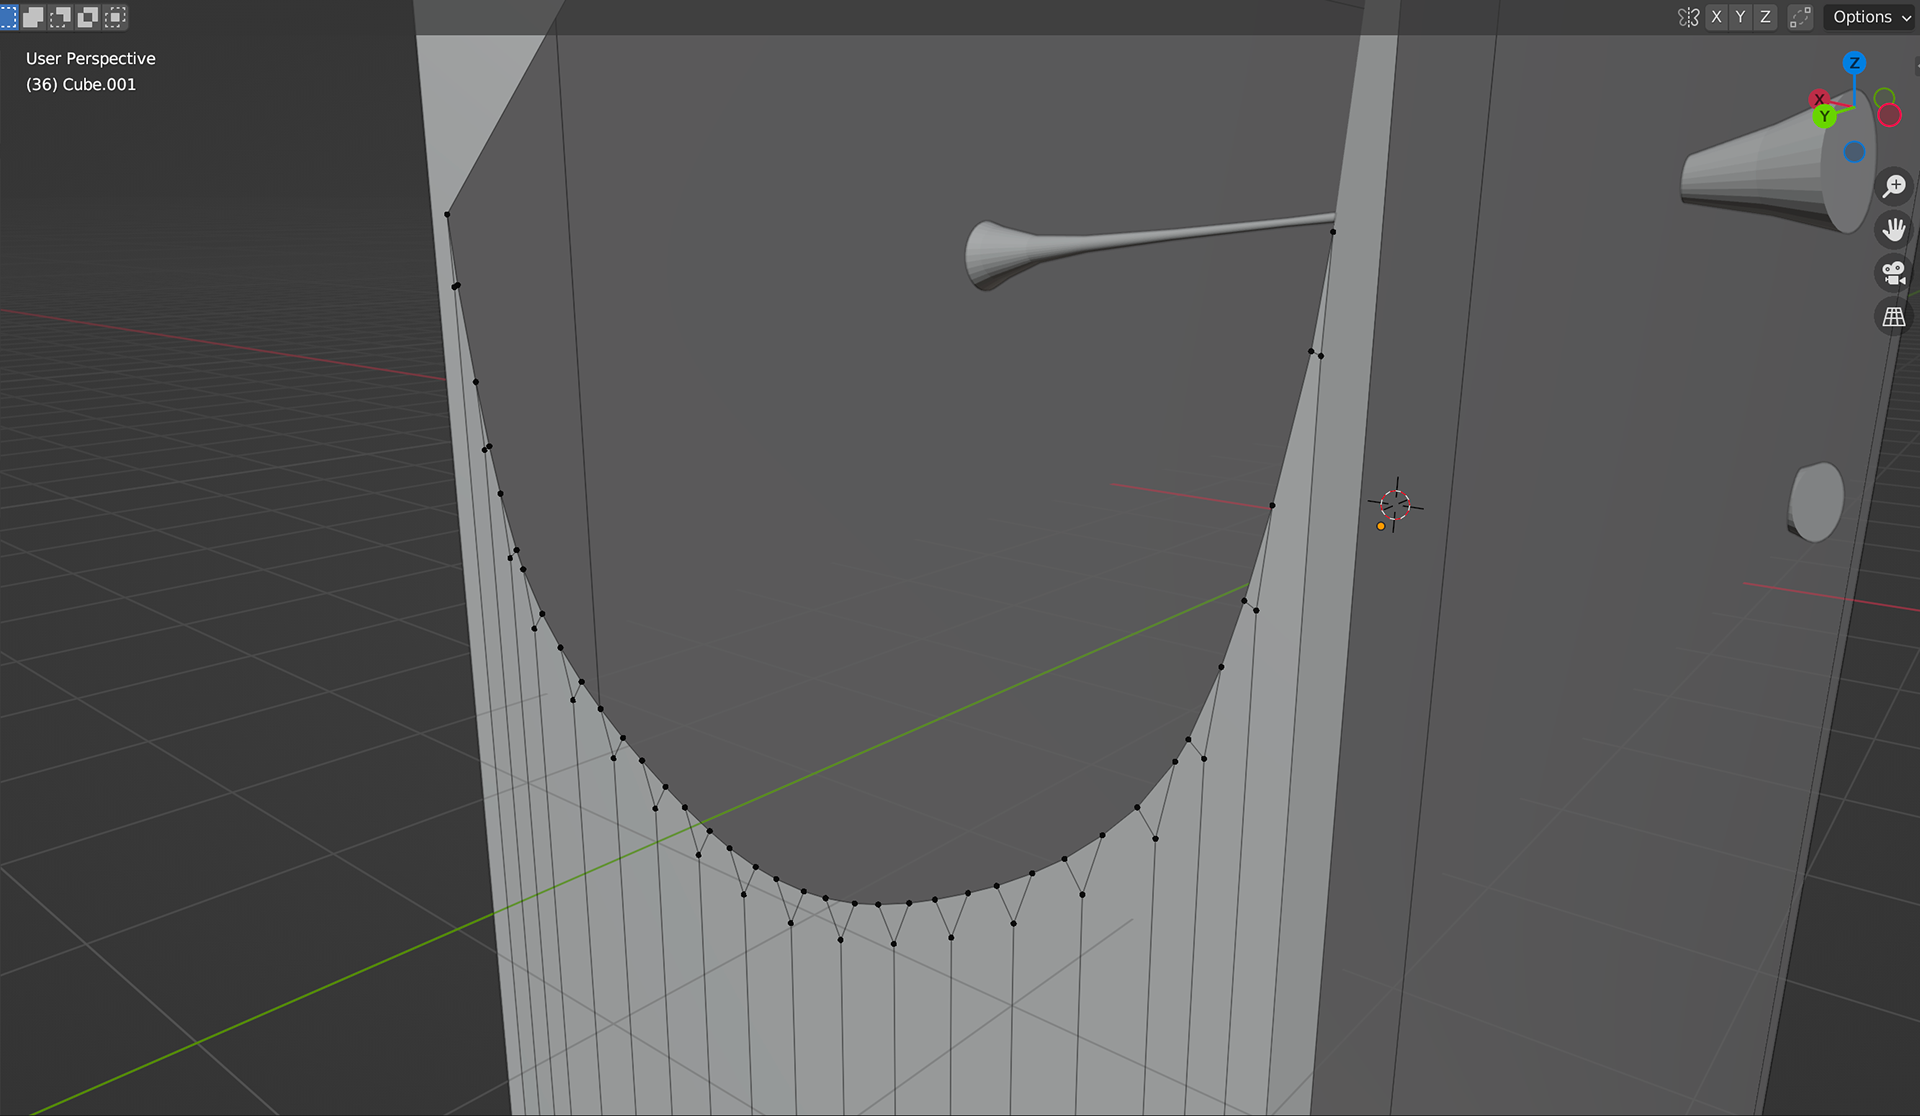
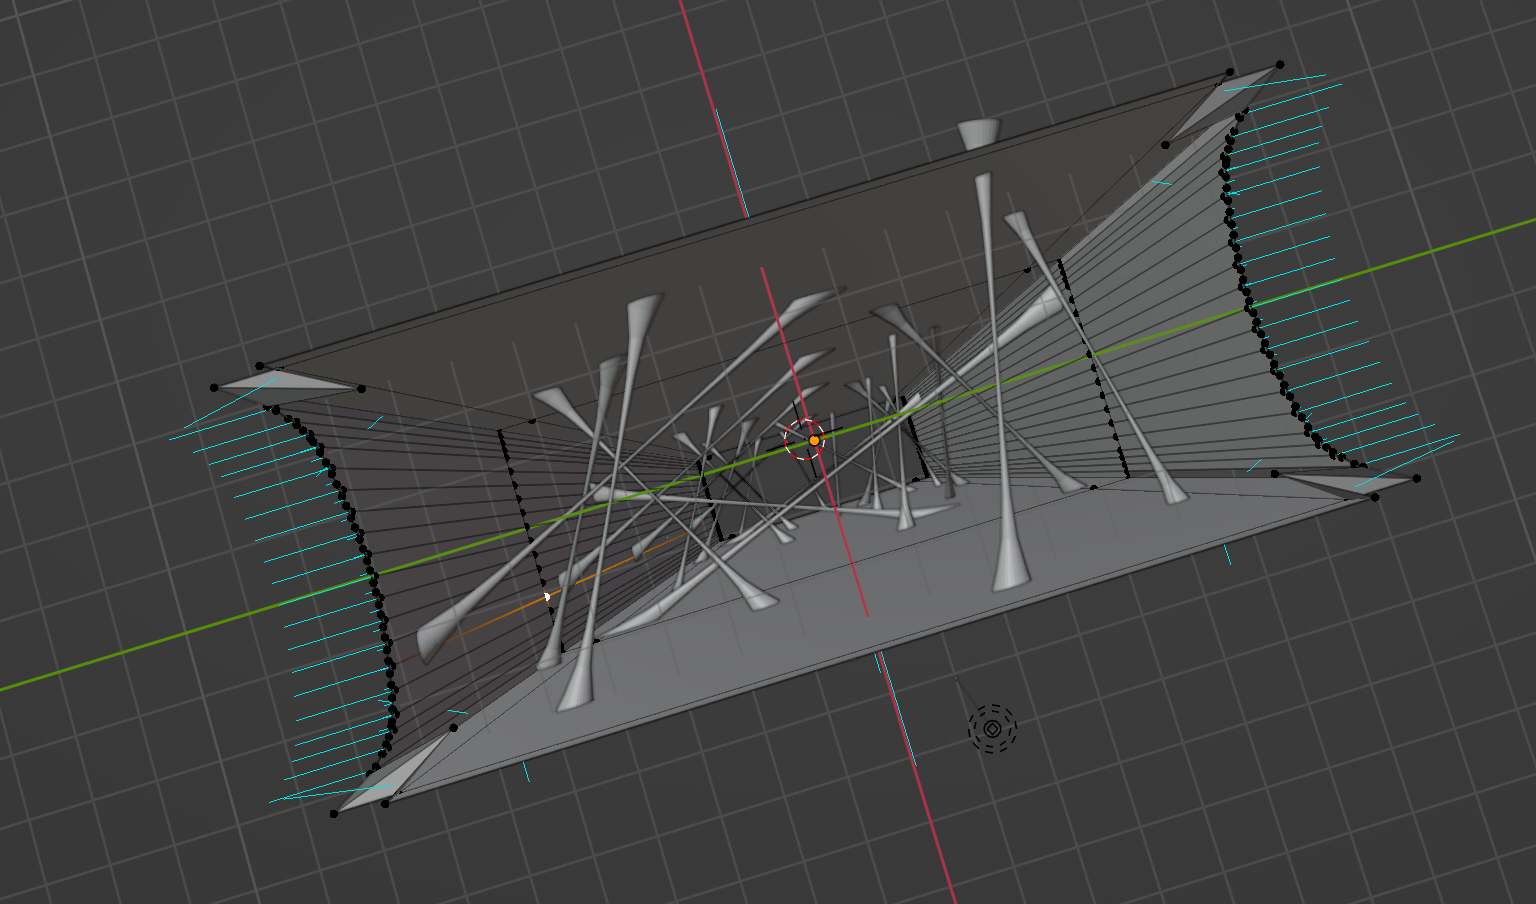
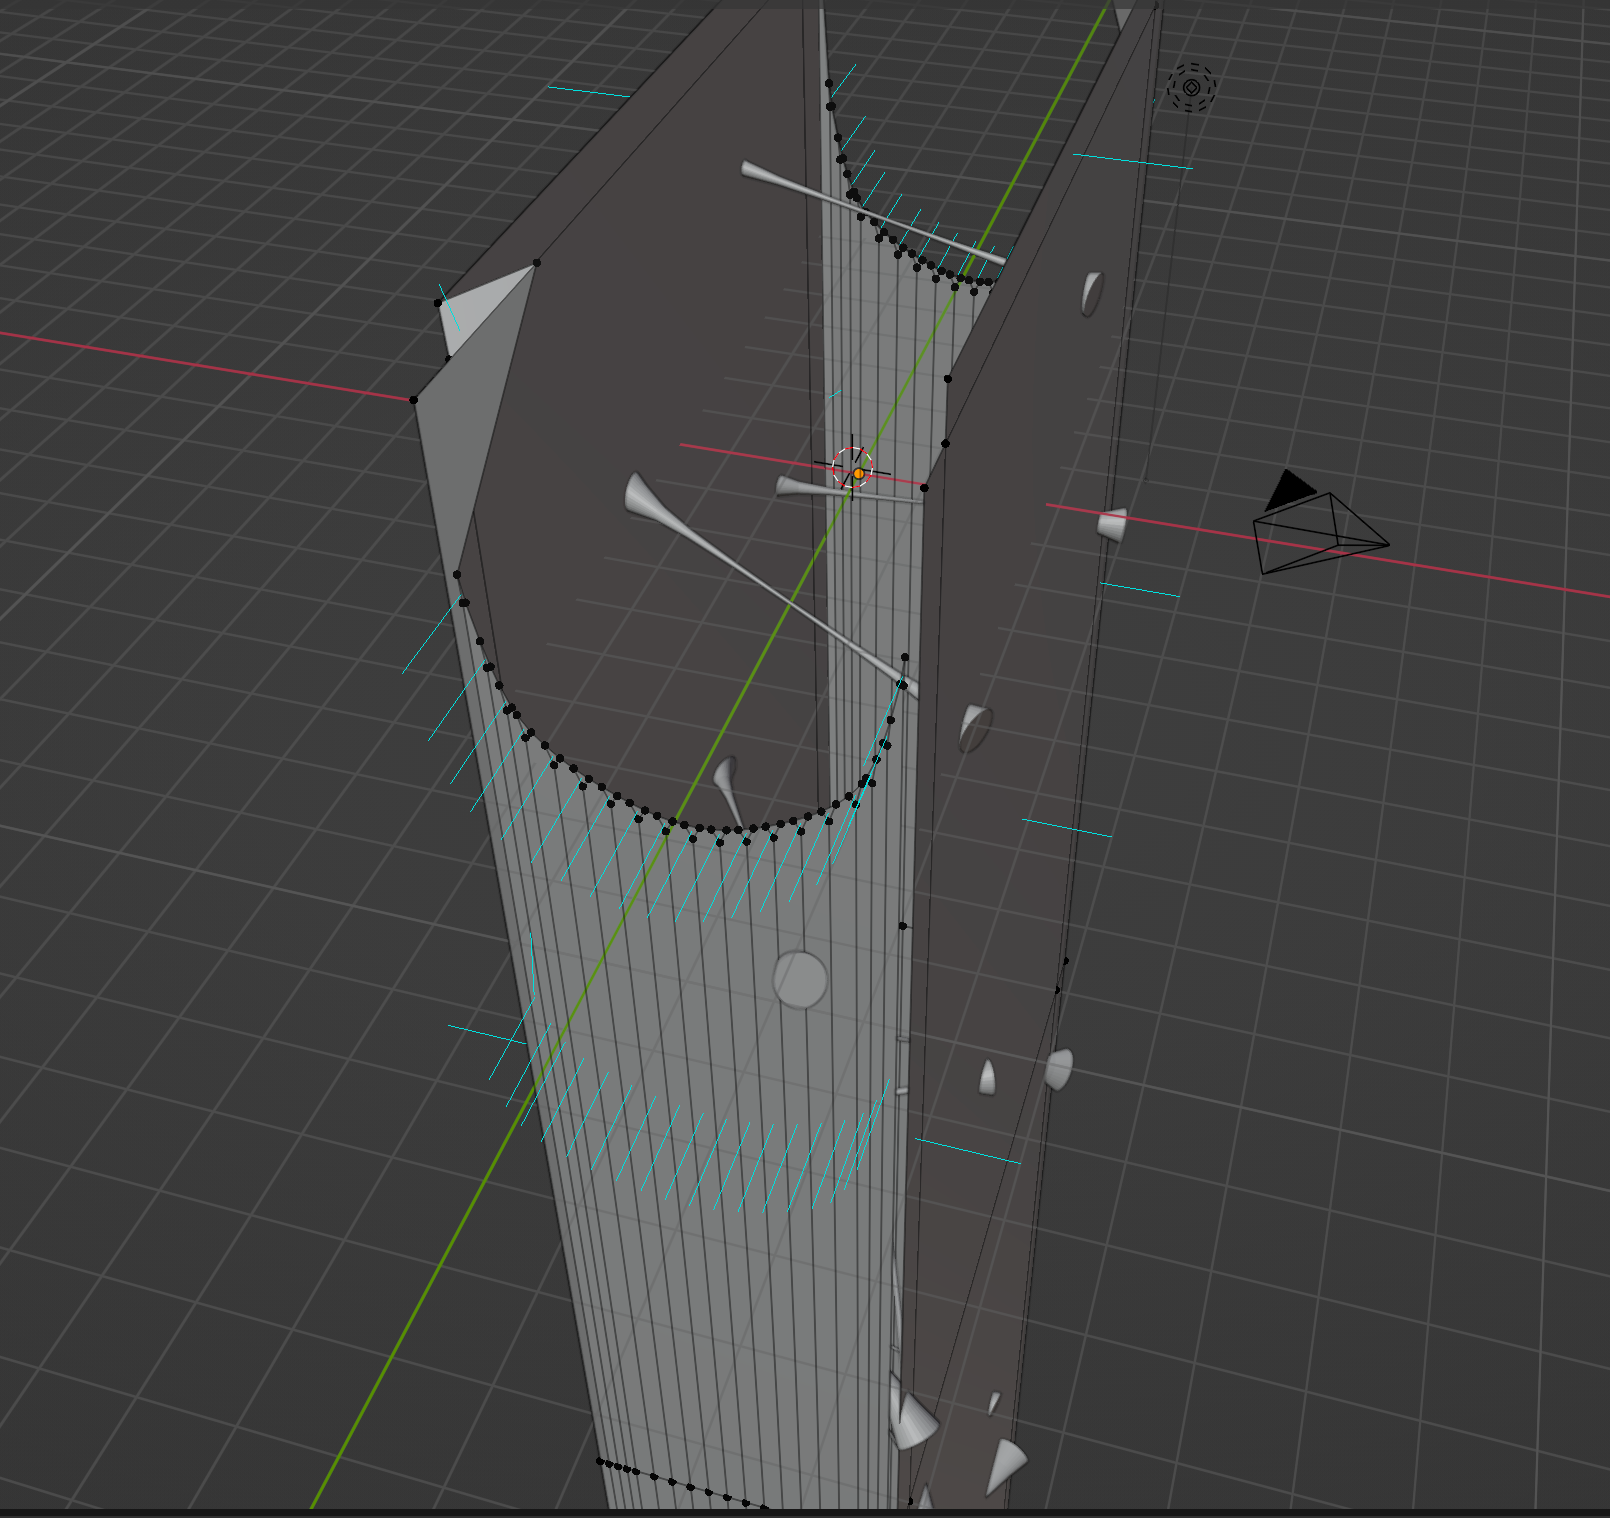
With this design for the console, I really liked the viscous, sticky shapes on the outside and thought it would be interesting if the startup animation took place inside the console and was flying through the sticky shapes. I designed the console in Blender by creating a hollowed out rectangle. I didn't know the proper way to create a curved edge, so I made loop cuts on the rectangle and beveled the edges to simulate the horned shape I was going for. I then folded the tips of the rectangle inward so that the horns would be visible from inside.
For the strings I made loop cuts on a cylinder and transformed the vertices so that the cylinder would be skinny in the middle, like the liquid is separating, and thicker towards the end. I then placed duplicates of the cylinder all throughout the console, adjusting the length, angle, and size as needed. This created a web like look to it, and when I finished I joined all of the cylinders into one object. I kept the web and the console separate so that I could texture them differently in p5.js.
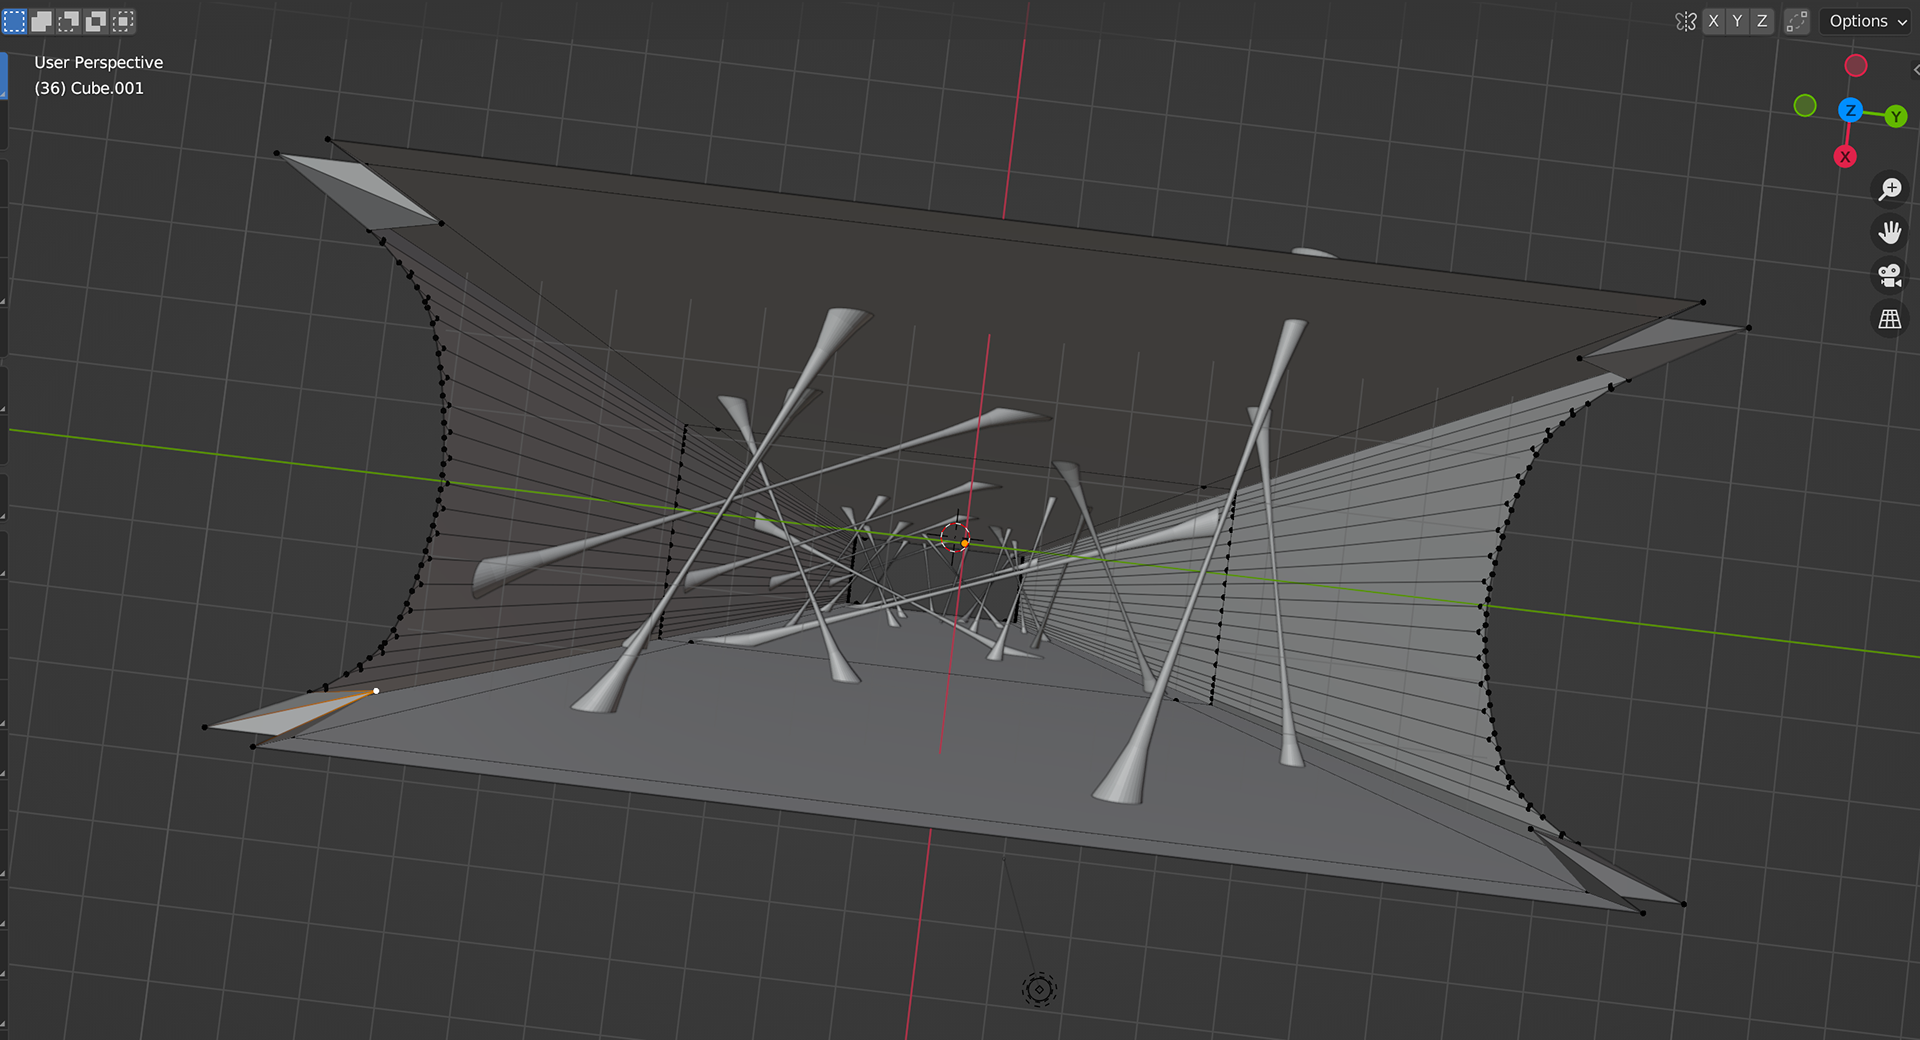
I then placed all of the models in p5.js and had them oriented so the camera was facing down the tunnel of the console, and created a camera movement leading all the way down. I added in an ease out towards the end, and did this by key-framing the camera movement speed by position reached.
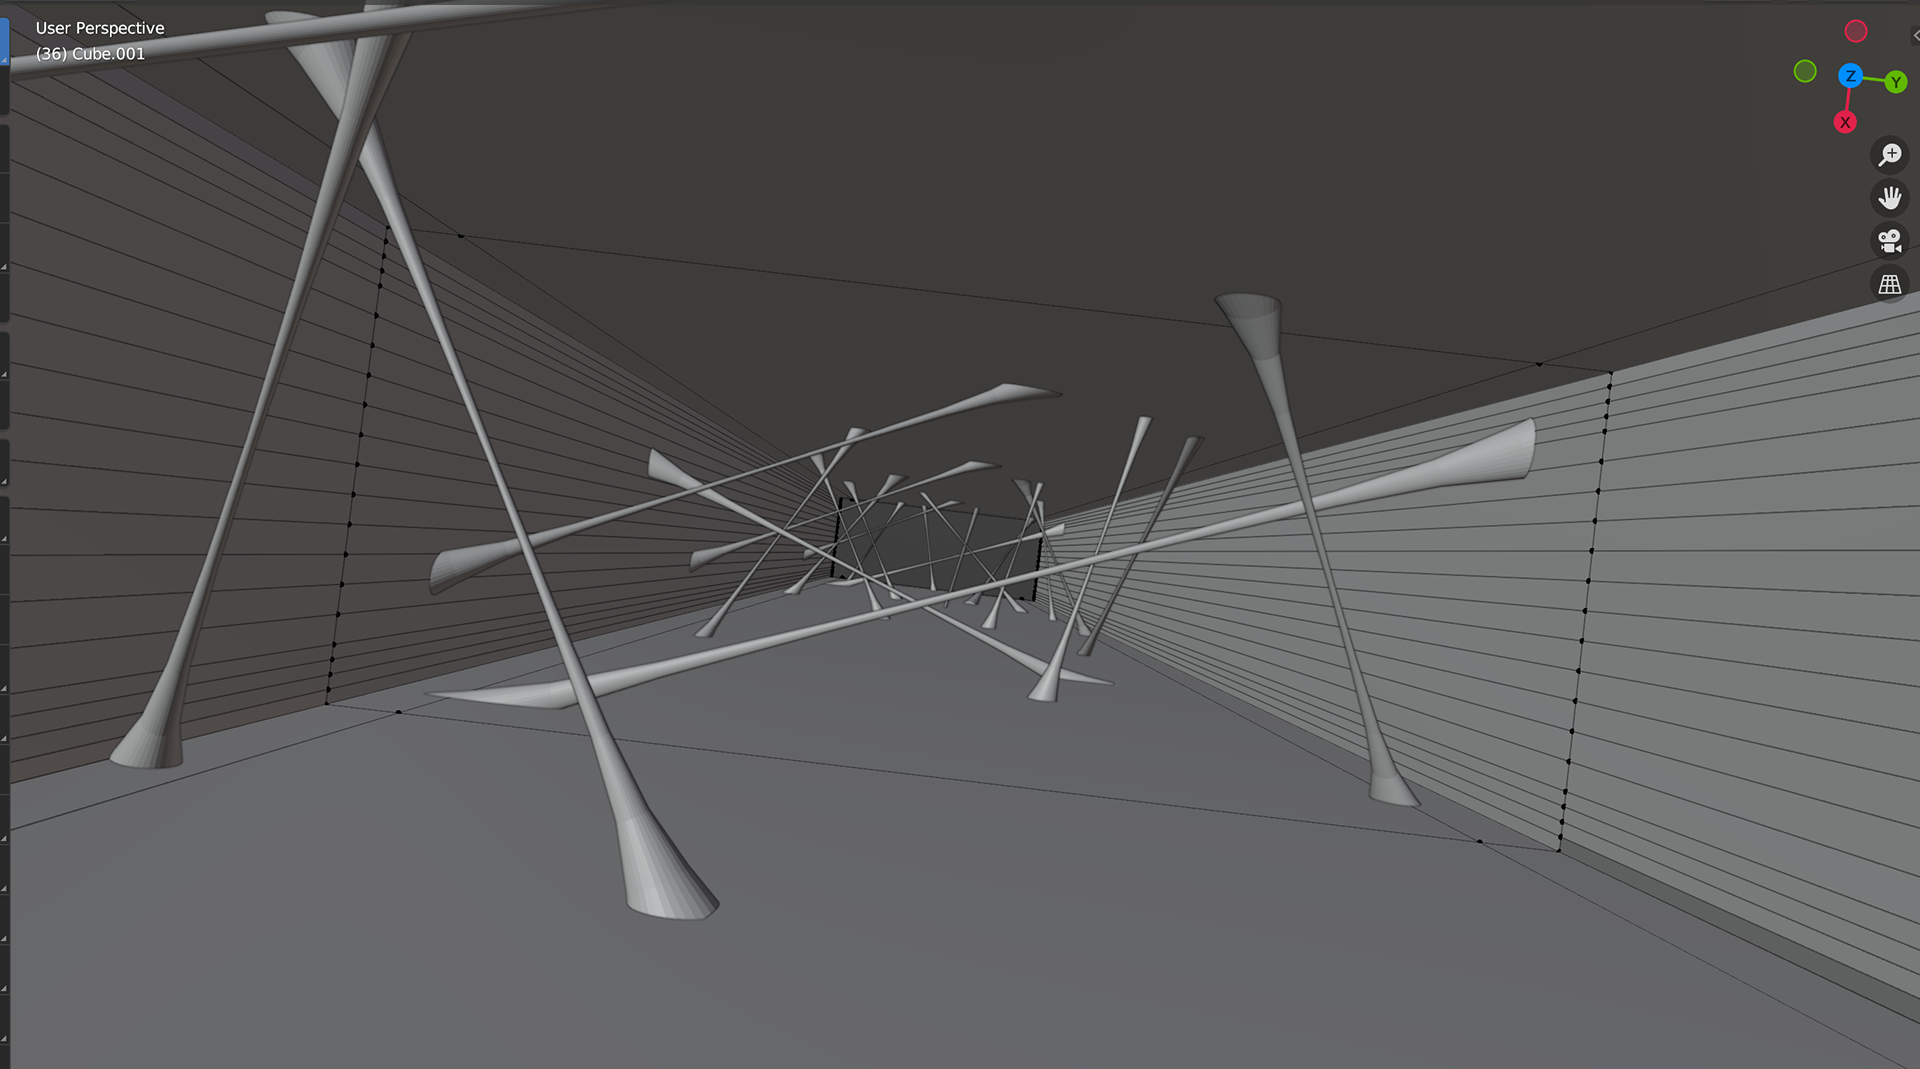
I then started lighting and texturing by giving the web a specular, ultra shiny material so it would look "wet", and brought purple and cyan lights to create interesting reflections inside of the tunnel. I also placed four "simple" versions of the console model at the end of the tunnel that did not have the horns pulled inwards, and then put cyan point lights inside of them to create a glow at the end of the tunnel.
I felt the tunnel was too dark, but I could not get p5.js to properly render the walls for whatever reason. The walls would be "evenly" lit, but only the first active light would render.
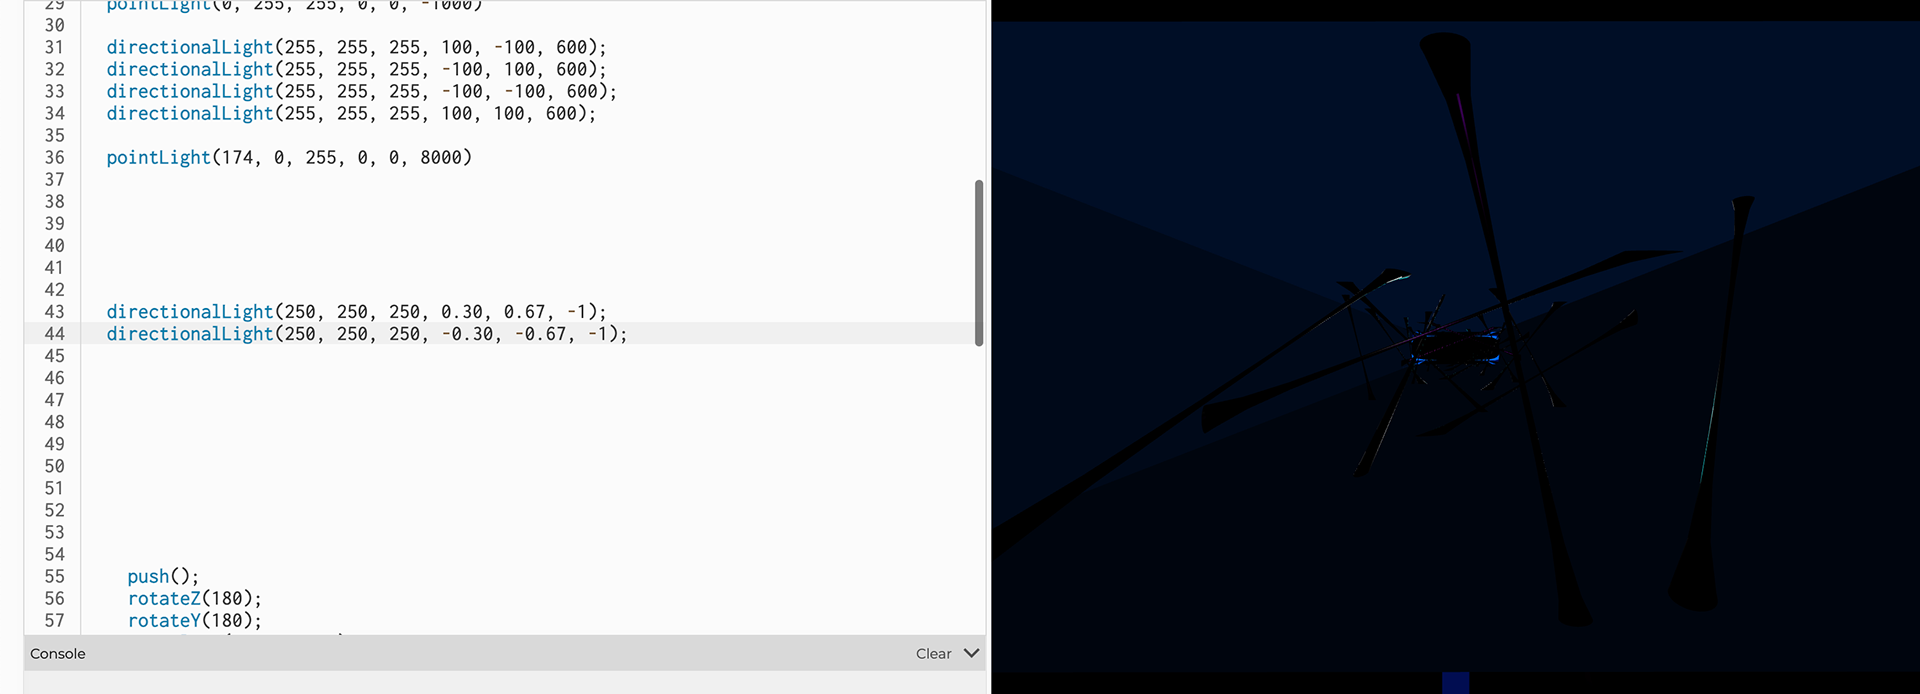
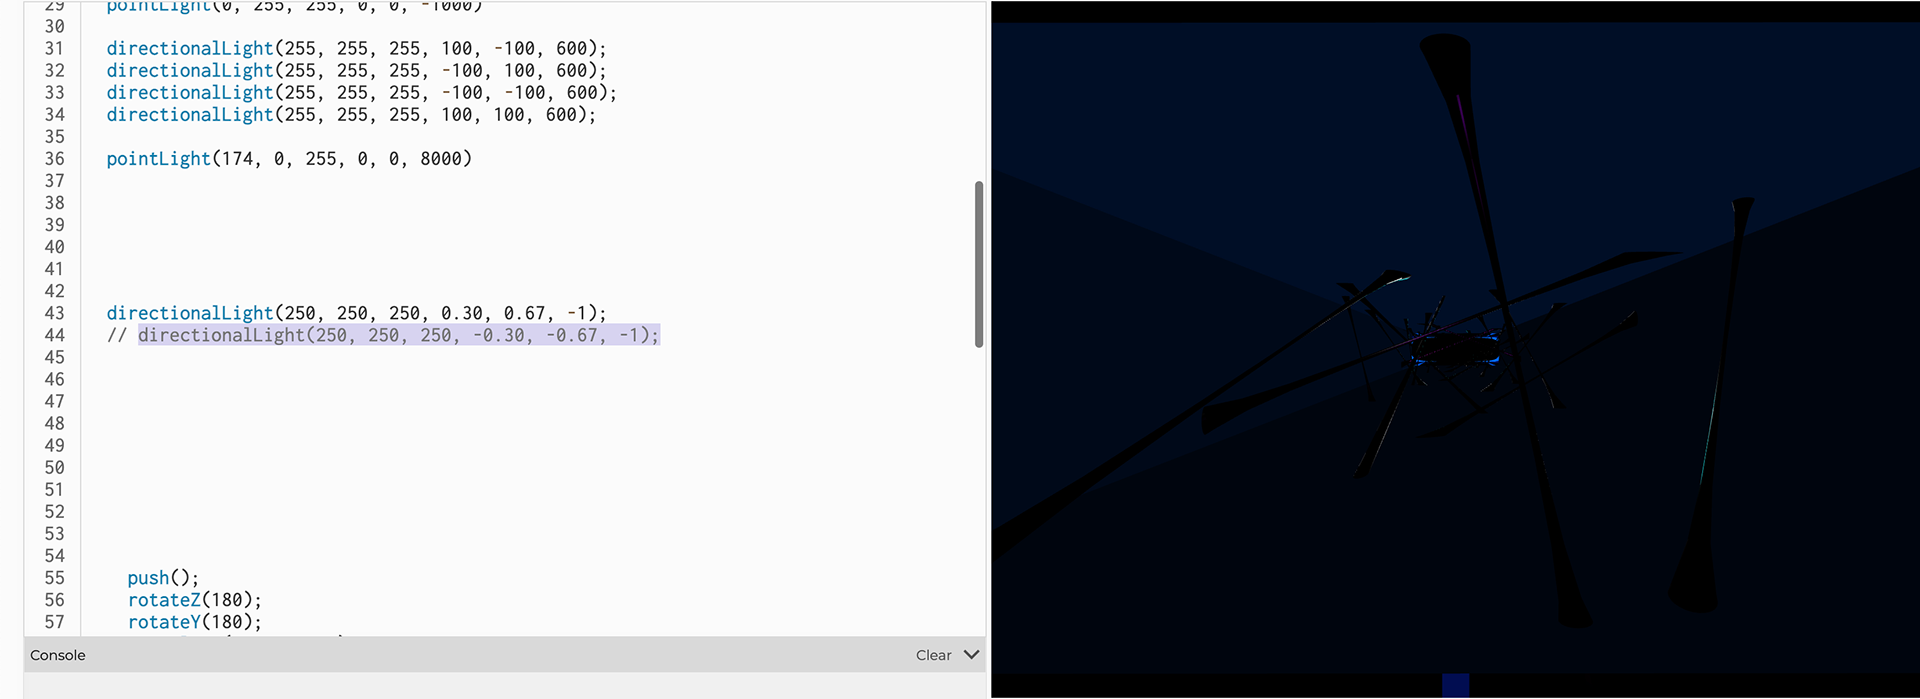
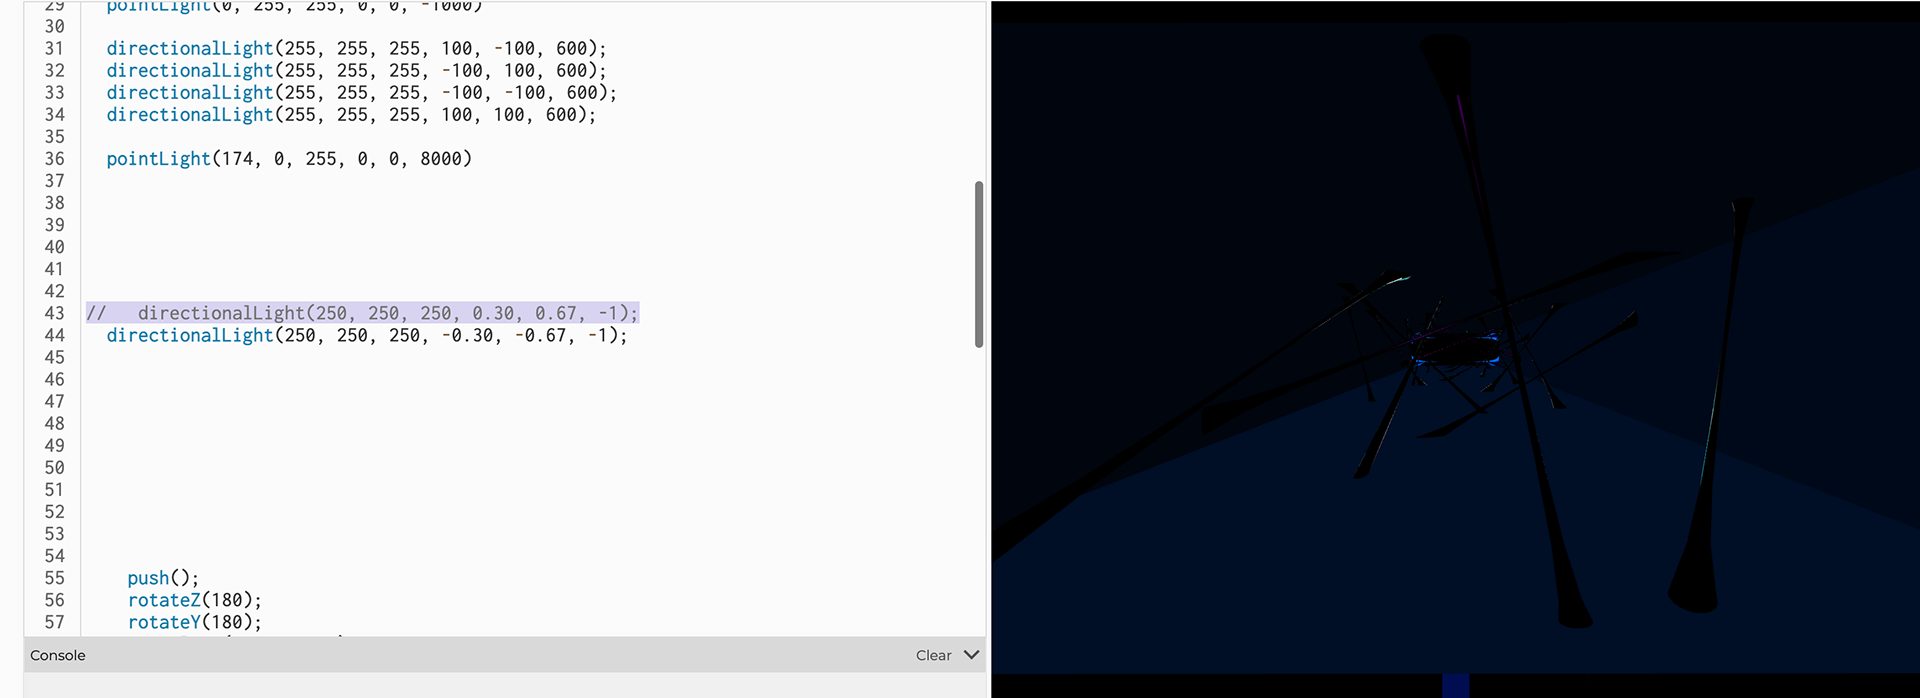
I met with Aidan Nelson who taught me about Normals in 3D modeling, and how it can cause weird effects with texturing and lighting. I managed to find that the vertices for the "horns" were creating four Normals on the corners of the model that slightly come inside of the console. I can't tell if these are truly inverted or not, or whether this was why the model was rendering wrong, but I cared more about the horns than I did the underexposure. Aidan also talked to me about spotlights, but I could not get spotlights to work well in my project. I ended up throwing more directional lights inside of the shapes at the end because it was causing a little bit of light to shine down the tunnel, and I only needed a little bit more light.

For the "simple" console shapes I placed at the end, I thought the lines of the horns across from each other reflected the lines in the imaginary logo I made, but after placing them I saw it made more of a silhouette of a plus sign in the middle, which wasn't what I was going for.
I played with rotating the positioning and found that the combination of the perspective changing as the camera moved forward, and the models colliding with one another made this interesting pattern that almost looked like a kaleidoscope, which I felt a lot better about.
My final plan was to add the logo in the middle, the one I drew on the side of the console. I want to draw the logo as a vector in Illustrator and use that to texture a plane that fades in or maybe spins, and for final polishing insert some short music that my friend is going to make for the startup animation, but I came down with the flu and it wiped my whole second week out, so I didn't have the energy to create the logo yet.
I'm really happy with how it turned out and think the webbing is unique, the reflections on the web was a happy accident and is my favorite part of the animation. I was worried that the console feels too futuristic when it's supposed to be a product from 2003, but I think the UI ended up feeling right and that the design of the actual console will feel more of the time period once I 3D model it.
Week 10 Creative Assignment
Immediately I knew for this sound assignment I wanted to make a miniature version of the vision accessibility features implemented in The Last of Us Part II, specifically the navigational cues.
I'm really interested in video game accessibility, which stemmed from frustration with games that force players to watch opening cutscenes before giving the option to turn subtitles on. When Last of Us Part II came out in 2020 it had the most customizable options I'd ever seen in a game, and I was really interested in the features they implemented to make the game playable without vision.
The main features they added in the game for fully blind players are text-to-speech options, unique audio cues for interactions and navigation, and the ability to reorient the character towards their goal. I wanted to see in this assignment if I could reproduce the mechanics for the navigational audio cue.
I made a player-controller square as well as a fleeing square, and locked them together in the canvas. If the Player square gets close to the Flee, its AI will activate to run away from the player. I also tied a radar beep sound to the spacebar, for the player to press to see how far away flee is: the volume, speed/pitch, and panning of the radar sound is directly proportional to the distance between the two squares.
Making the volume proportional to the distance was difficult to figure out, because at first I did not want to have boundaries on the canvas, so there was no maximum distance to divide by in order to make distBetween a ratio. I eventually had to box the player and flee in to make volume = 1 - (distBetween/maxDist).
I ran into a lot of issues with using sound in p5.js, I could not get the game to load an array of footsteps correctly, the canvas would just load forever. I made the setting a forest that the character is traversing, and I wanted to have variation in the terrain where if they walked over a large square labelled pond the game would load wet footsteps while moving, but I kept getting bizarre errors with booleans not working correctly. I set inPond = true only if the player was colliding with the pond square, and if isPond = true && the player is walking, only then the wet footsteps would play... but the wet footsteps would play even if console.log returned that isPond is false. I had also set that if the player was not colliding with the pond, inPond = false, and if they are walking and inPond = false, then the grass footsteps would play. But it kept playing the wrong footsteps no matter what I did, so I had to scrap the idea.
I spent so much time just trying to get things to work that I ran out of energy to give the game more juice/fun, so the only positive feedback right now is the audio cue when the player collides with the flee. I've sound designed a lot of animated films and I've dabbled in sound for games, so I'm used to manipulating audio in DAWs like ProTools or game engines like Unity. It was frustrating getting so many errors using audio in p5.js.
At the end of the assignment, I turned all of the colors to white to hide what is going on behind the scenes and make the player rely on the audio cues to find where flee is.
Week 9 Creative Assignment
I really wanted to incorporate 3D into this assignment as well, and since I'm very interested in motion capture I wanted to experiment with PoseNet to see if I could tie a 3D model's movement to the webcam.
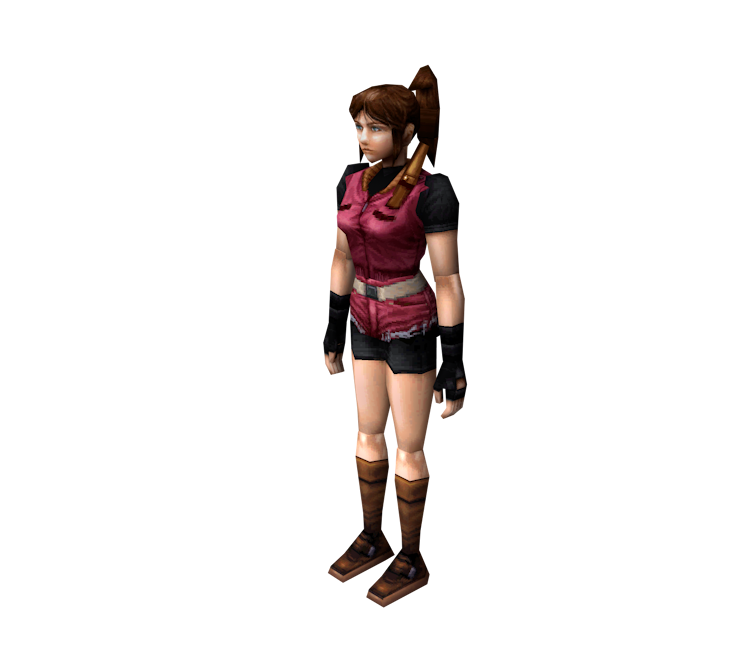
I used the 3D model of Claire from the original Resident Evil 2, because I've been studying it the past couple weeks to understand the geometry of models made for 6th gen consoles, and because I love Resident Evil.
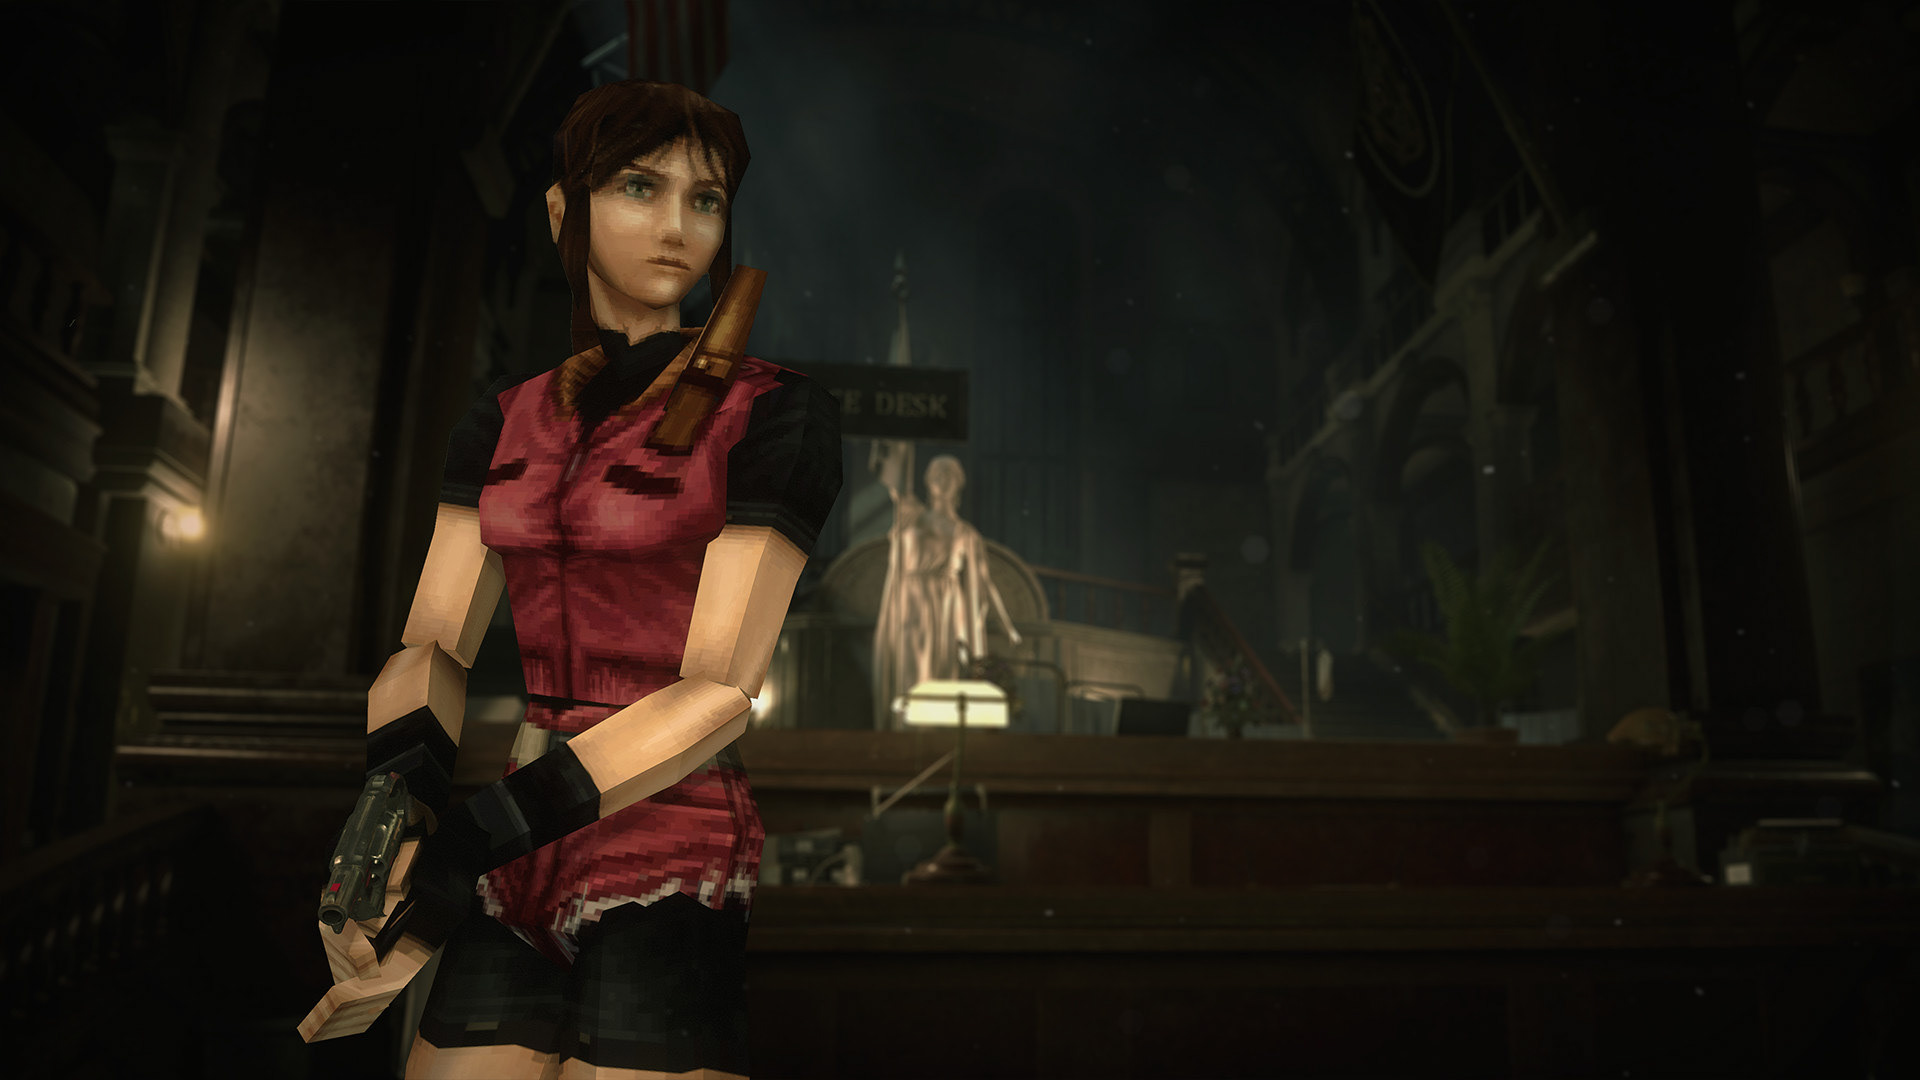
Importing Claire into p5.js, I tied her X/Y position to pose.nose to test how the model would look as it moved across the screen. It was like waving a rag doll around since the model is stiff. I also realized her model's origin point was probably on her feet, and she was loading upside down and backwards. I wanted to change the origin of the model, and I thought it would be interesting to try separating Claire's body parts to "rig" in p5.js with PoseNet... I knew this would probably look funny in p5.js but I wanted to try anyway.
I don't know how to use Blender but have been wanting to learn, and I needed to know some basics in Blender to look at the vertices for Claire's model. I did the basic donut tutorial everyone watched during quarantine and felt more comfortable with the UI.
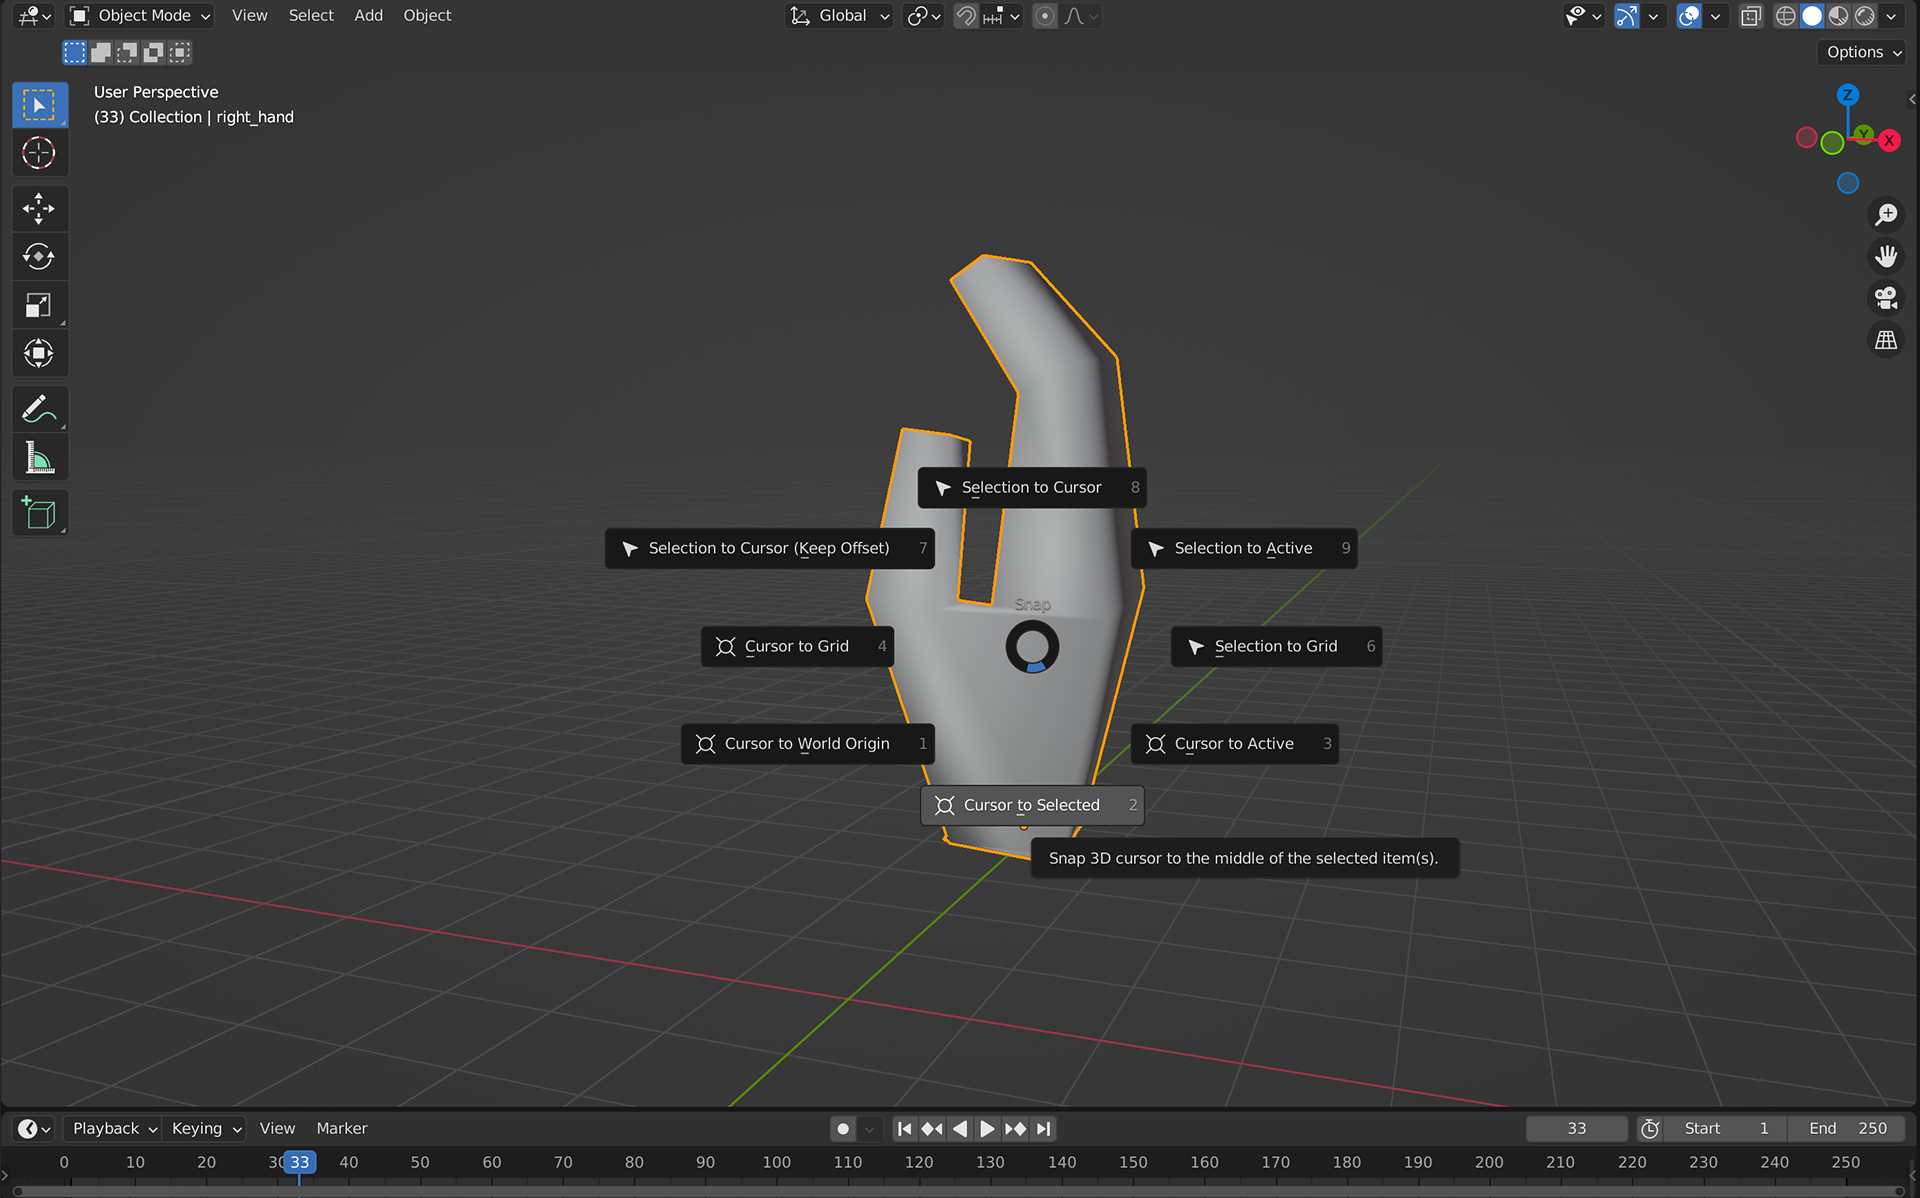
Claire's model is extremely polygonal which made it easier for me to see which vertices would work to use as a point of articulation in a rig. I first changed Claire's origin by placing the 3D cursor on the vertex at the tip of her nose, and then I set the origin to the 3D cursor. Claire was moved to the very middle of the canvas and rotated so she would import upright and facing the camera.
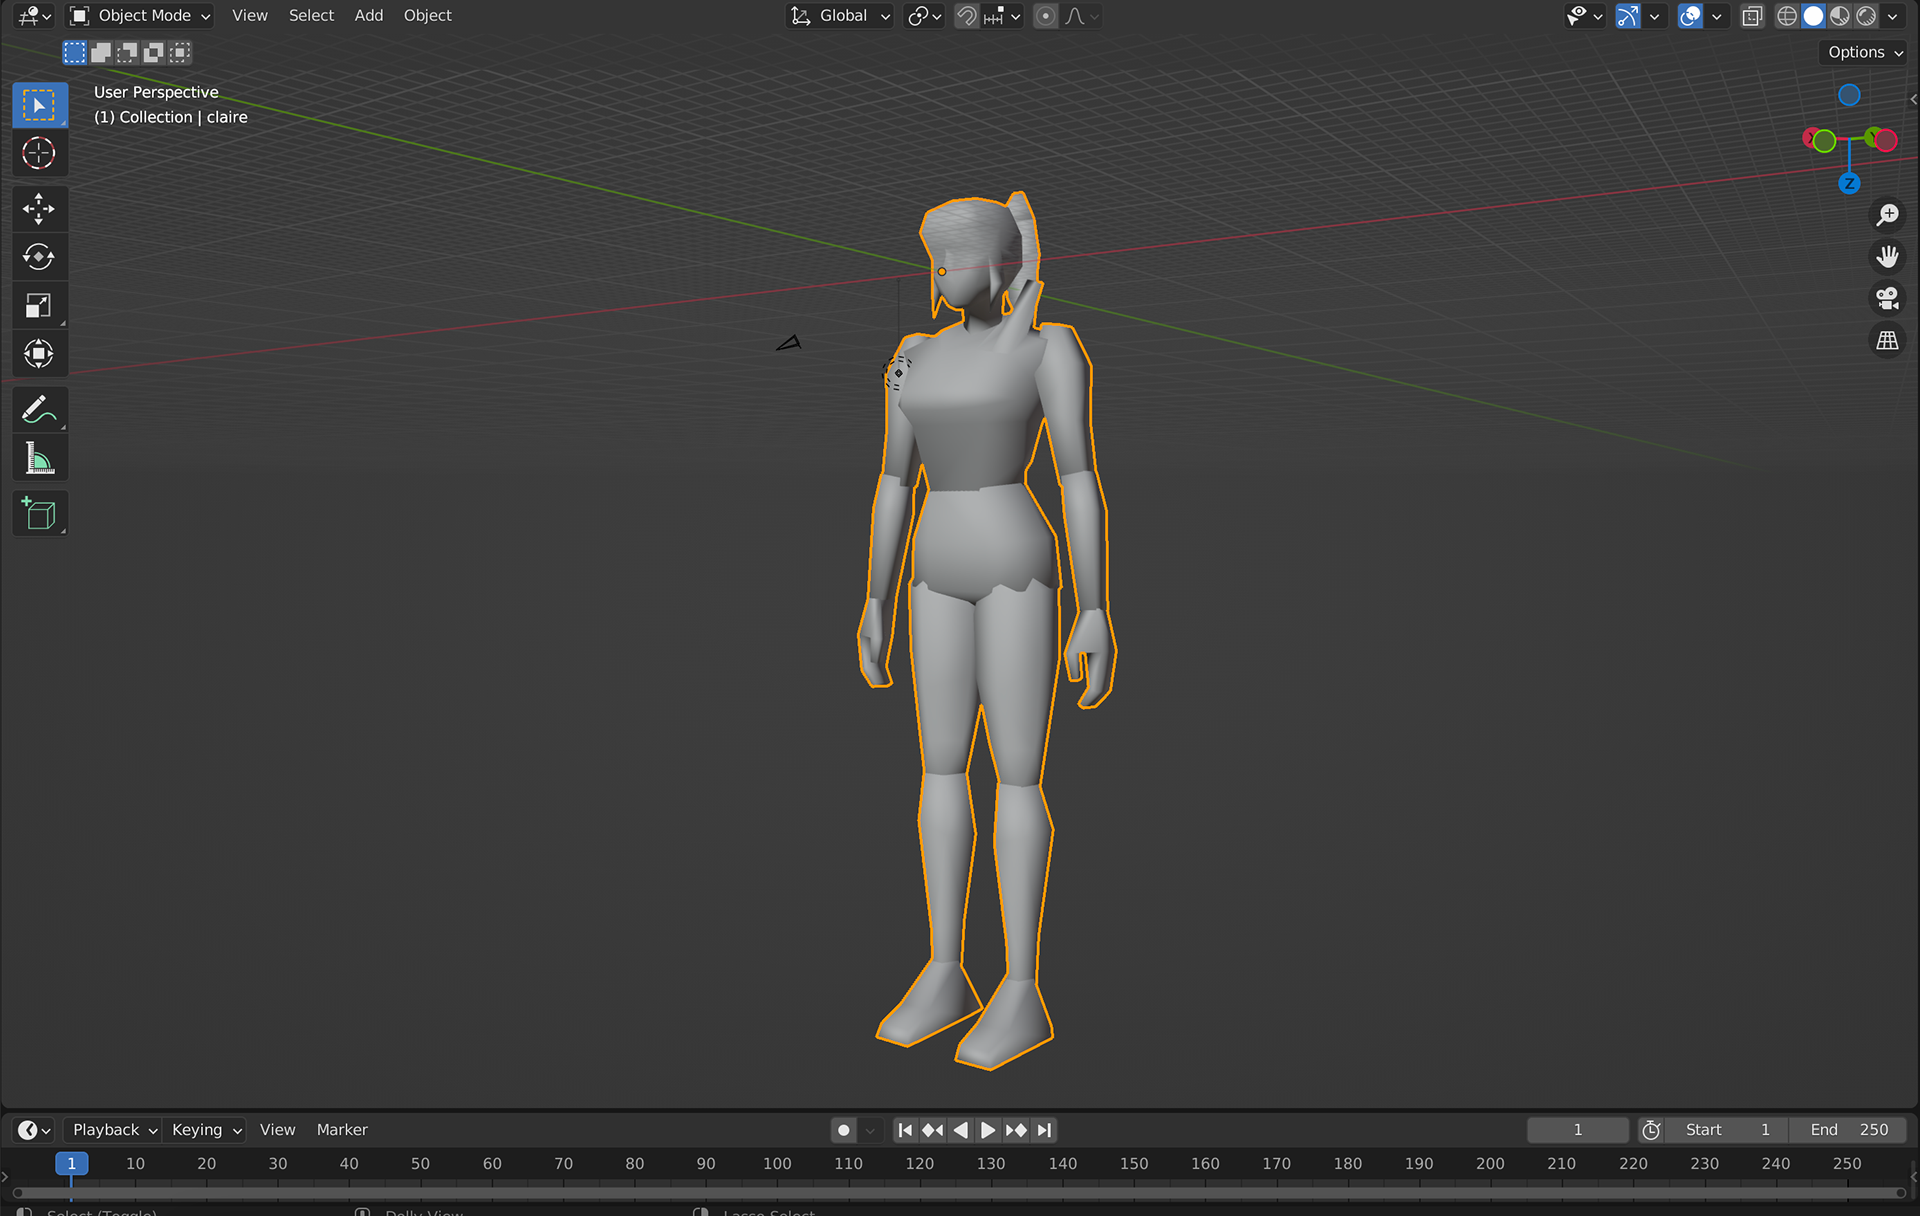
I then highlighted the vertices of the limbs I wanted to duplicate and separate into a new mesh, which took some time to clean up.
I realized that the shoulder information in PoseNet would need to be tied to the upper arms instead of the torso, so I attached the upper part of the torso to the head since the head in real life cannot move position without the torso anyway. I also attached the thigh to the hip pose and duplicated some vertices so there wouldn't be a gap in the crotch if someone moved their legs really wide, though when the model breaks the collision looks a little odd.
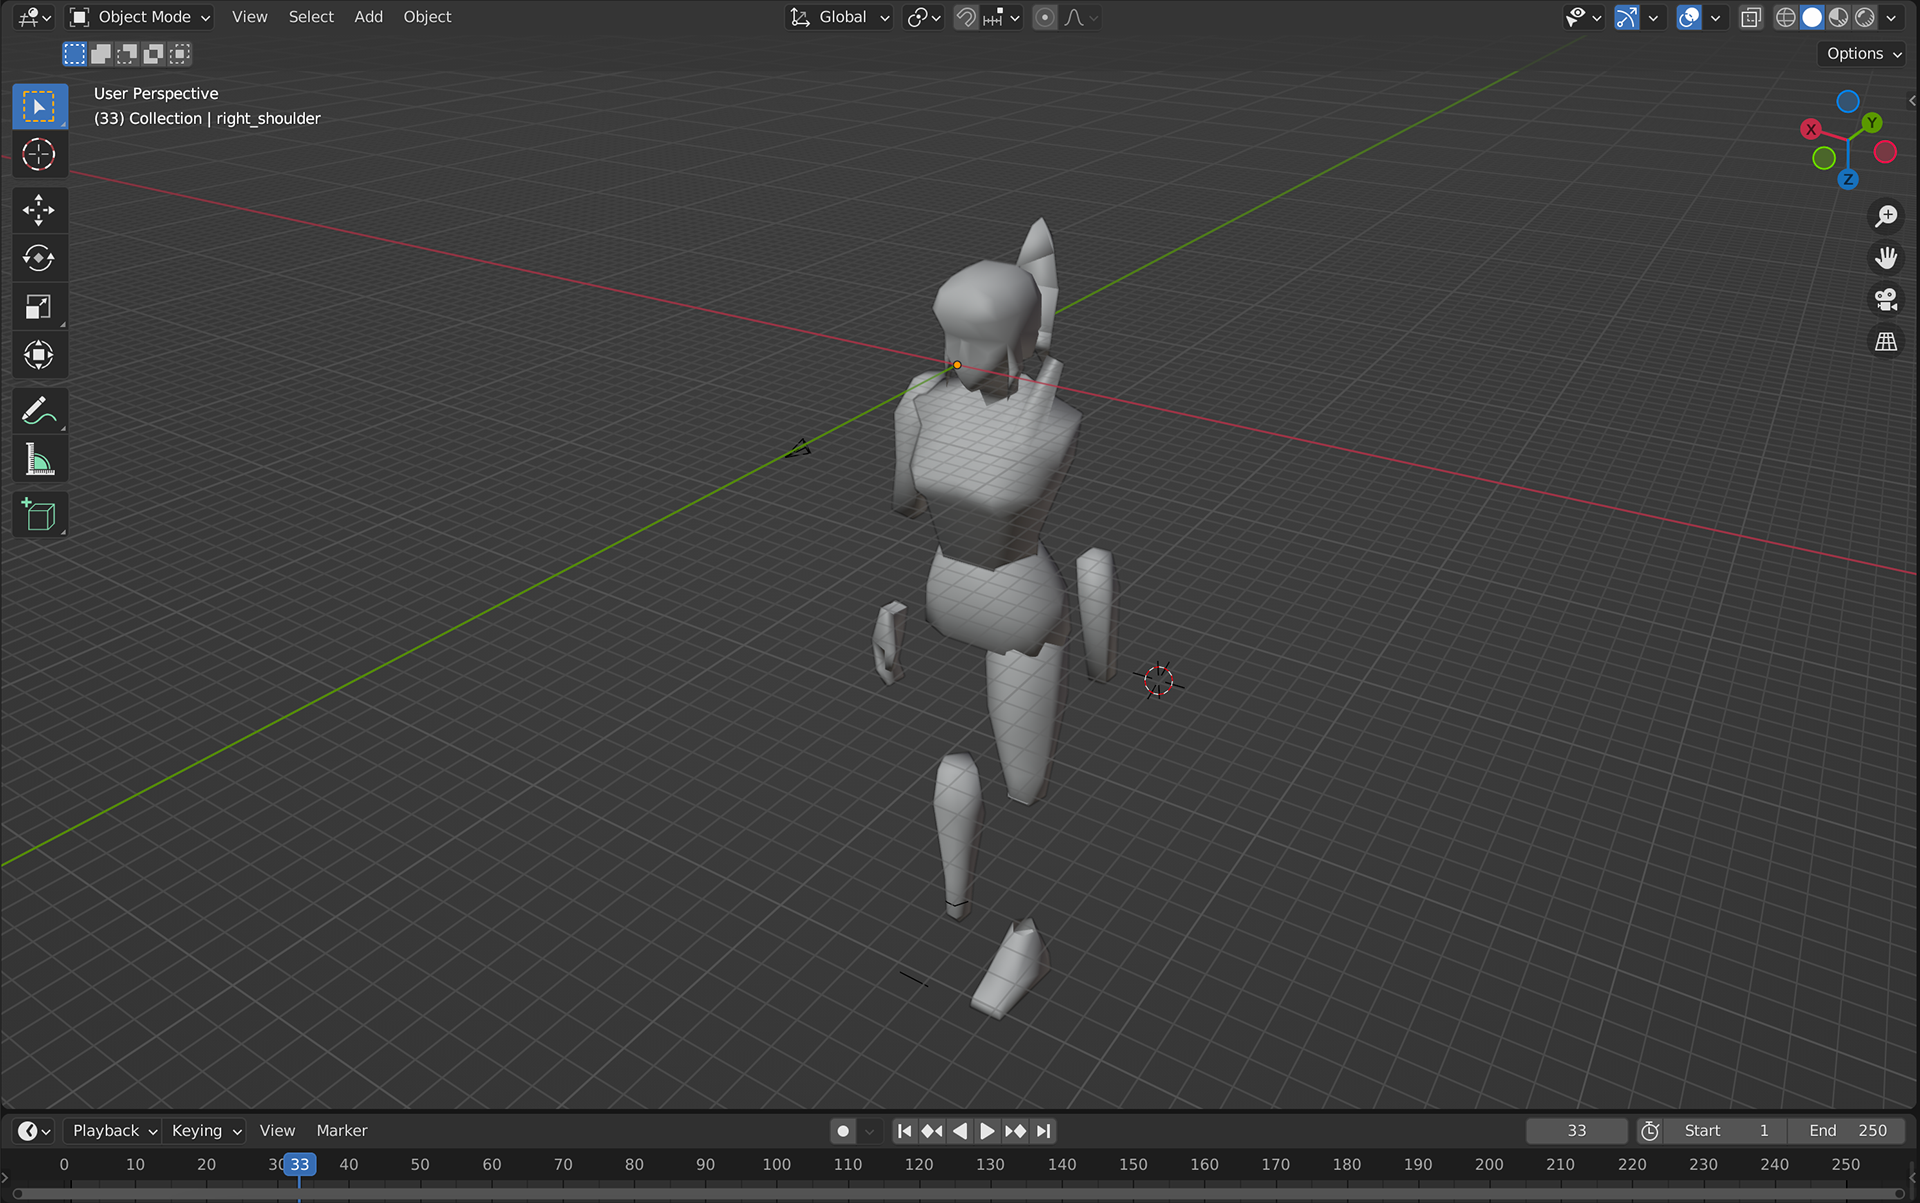
I exported separate .objs of her body parts and then imported into p5.js. I thought that keeping the origin of the body parts relative to her head would mean the model would import with the right proportions, but when stepping in front of the camera the parts were really spaced out from one another, so I went back in Blender and changed the origin of each body part to be a vertex that made sense for the point of articulation.
Re-importing into p5.js, the model still looked really spaced apart until I stepped far away from the camera. PoseNet really does need to see the whole body to work correctly, so when I set the camera up and walked down the hallway the model lined up much better.
The obvious problem now is that the body parts load facing up and down, so if you move your arms up and down the limbs just move position without rotating. I do think it is possible to tie the rotation of the 3D parts to the position of other points of articulation, so if I move my arms to the side the elbow model would rotate towards the wrist model, but I could not wrap my brain around the math needed to get this to work and whether it would even look good. I would also need to figure out how to rotate the model with some sort of pinning, so body parts would rotate around their origin point instead of swiveling and causing gaps in the rig.
It takes a few seconds to load the webcam, PoseNet, and the 3D model, so I thought it would be interesting to have a "loading" animation to hide this. In the early Resident Evil games, as the player would move through doors the game needed time to load the next area, so the developers created a surreal animation of a door that would open into a black void. This animation would play every time the player interacted with a door and effectively hid the time it took to load the new assets.
This was strangely the hardest part of this assignment: I wanted to load the video of the door as a texture on a 3D plane, placed in front of the model of Claire to give her time to load in, and after the video played I wanted to remove it or move its position beyond the camera.
I thought moving it offscreen would be easier... but it was not, weirdly I could not get the code to change the X/Y position of the plane after 7 seconds passed. I only figured out how to get the variables I made for the X/Y position to update after I gave up and began looking into the splice function. I could only get splice to work if I made an array and for loop for the single plane. I figured this worked well enough, though there is a bit of lag at the beginning of the animation. Lastly, I added the background of the RPD east office from RE2 and some pointLights.
If I had more time, I thought how it would be fun to emulate the main menu to choose either Claire or Leon's story, and then have the door animation play before loading whichever model the player chose.
It would also be interesting to make it where if two people are on the webcam, one would be assigned Claire and the other assigned Leon.

I'm keeping the webcam visible so it's easier to see how far back you need to be to get Claire to line up as well as possible. Over the weekend I coded on my personal computer and the webcam is much more zoomed in, but on Monday I tested the code on my work's laptop and it is a bit easier to get more of your body on the webcam.
Link to sketch.
I saw some really advanced use of PoseNet for 3D motion capturing with Three.js, I definitely want to dive into learning Three.js this week since I didn't have time last week. I also want to learn Three,js because it looks like the best way for adding textures to 3D models that have complex geometry, because it can use a .mtl file.
Week 8 Creative Assignment
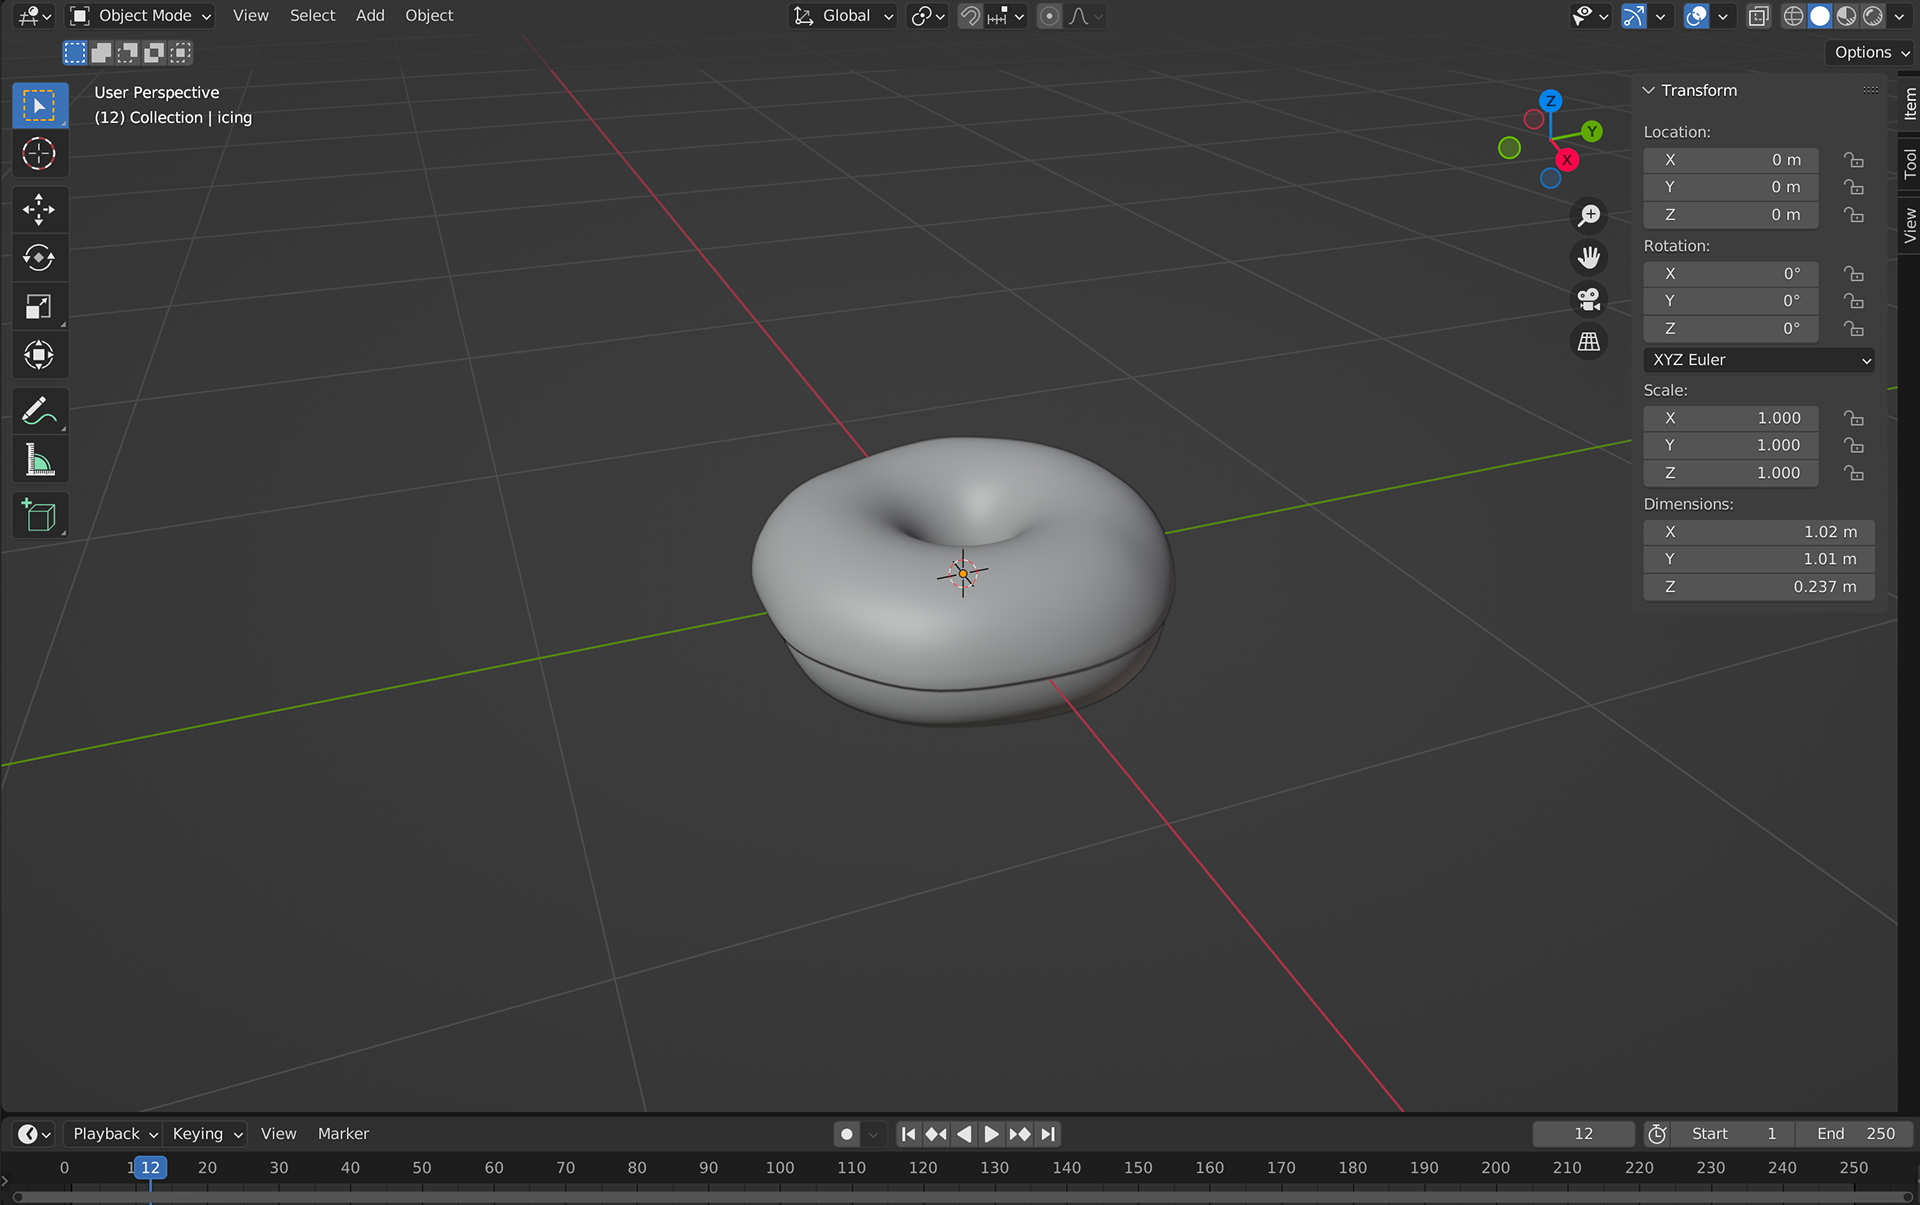
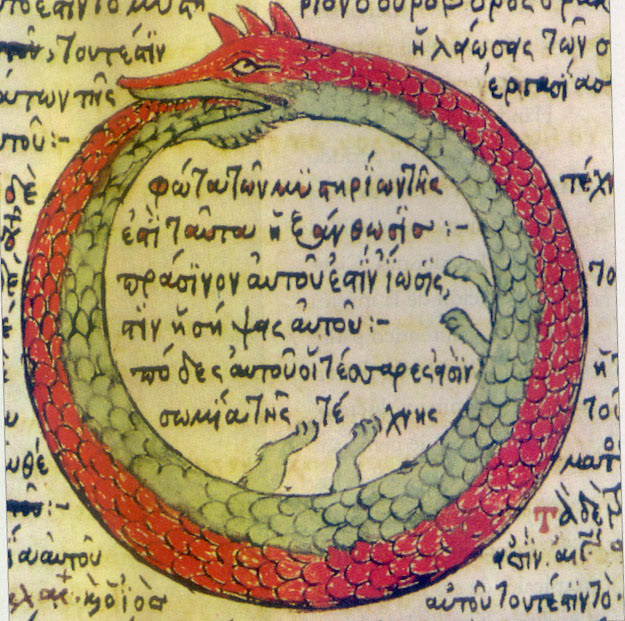
I wanted to learn 3D as I am really interested in using it for my final, and I know very little about 3D in general. I was interested in the torus so I decided to do an ouroboros, since I felt the circular shape would work well with a snake texture. I wanted to do something thematically with a cobra ouroboros and a mongoose, but soon realized I couldn't create a readable texture of a cobra hood that would fit well, so I landed on combining ouroboroi with the greek myth Medusa.
I chose to sample the texture and face from this drawing in a 1478 Greek alchemical manuscript, as I liked the design of the face and the simple texture of the scales.
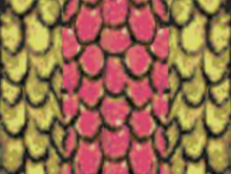

Once I made the texture, there was a lot of trial and error to figure out how p5.js would map the image over the torus geometry. My professor/colleague/friend Dean helped me realize that the texture needed to be horizontal instead of vertical, and that the seam of the image met on the outside of the torus, when I had originally thought it met on the inside. It also became apparent that I needed to make the underside of the snake's jaw.
I split the snake in half so the top of the head would go over the outside of the torus, and used the head to create the underside of the jaw, and added a drop shadow to create depth.
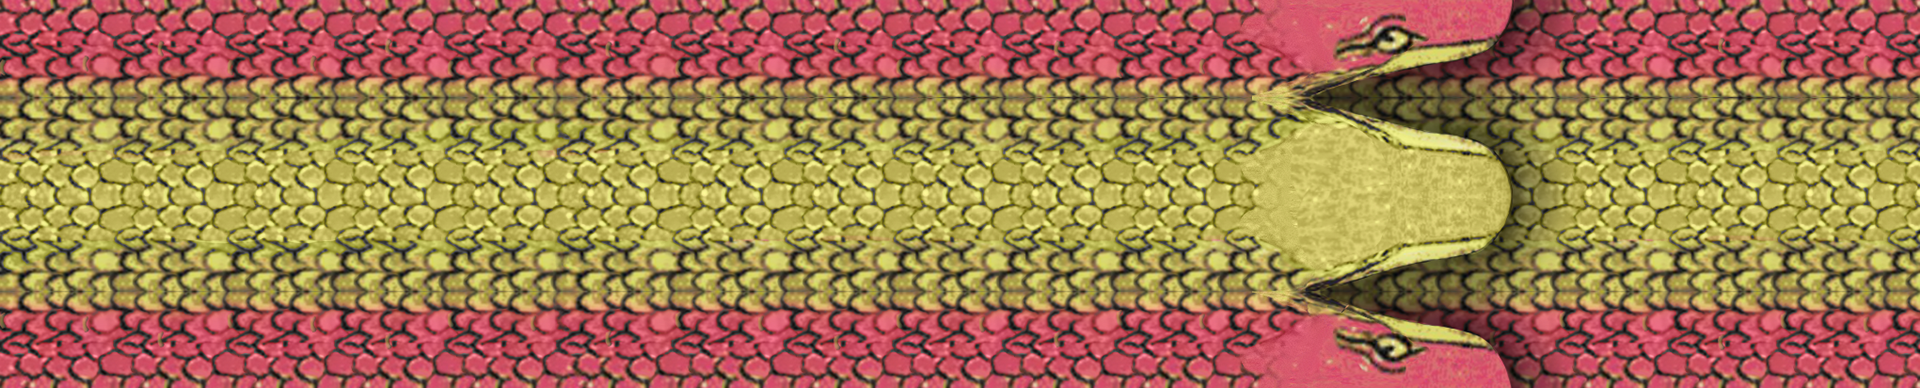

After finishing the texture, I made a plane textured with a mosaic of Medusa from the Archeological Museum of Sousse, and decided to change the color palette of the snakes to match the background better. I also made an additional texture where the snake head was farther back on the image, so that the two heads would not intersect so perfectly. I liked how the position of the toruses intersected with the plane, because it made it look as if the snakes were coming out of Medusa's head.
I spent a good amount of time experimenting with lighting, which I found very difficult because I could never get ambientLight to work, and it took me a while to understand how the color values corresponded with the amount of light being produced.
Lastly, I added two low-poly hands made by scribbletoad on Sketchfab, and made their position tied to mouseY so that the hands could be moved up and down. I wanted it to appear that the hands would freeze and turn to stone once the hands were close to Medusa, but I couldn't get p5.js to place the skin texture well over the hands, so the change from skin to stone was not obvious. I tried manipulating the size and orientation of the skin and stone textures, but ultimately I then decided to switch gears by changing the lighting to be more dramatic, and still have the hands freeze to give the impression that Medusa is stopping them from coming any closer. I think this gives it a tense, cyclical, and dramatic feeling.
I think the hands did not necessarily need to be 3D, and looking back I think the skin/stone texture could easily be achieved by using two planes with png hands as the texture. I made the lighting change a little bit before the hands freeze, because unless people move the mouse slowly/deliberately then sometimes the hands will stop but the mouseY position will not be low enough to change the lighting.